szwedaconsulting-logo

(2024) Billable Expenses: A Guide from Your QuickBooks Trainer

By Ben Szweda

(Updated 2024) A lot of service professionals spend a lot of time and energy passing on expenses to their customers. Maybe you’re an interior designer and you buy furniture for your clients, then pass on a marked-up cost. Maybe you’re a painter and you buy the paint for your client. Maybe you’re an IT professional and you pay for various subscriptions for your clients. Whatever your job, it is common practice to purchase things on behalf of others and then pass those costs on later in an invoice, with or without markup. QuickBooks has a well-integrated method for making this process take no time at all and for ensuring that you don’t forget to invoice your clients for anything they should be paying for.

You can watch our YouTube video on this process here.

Billable Expenses: About

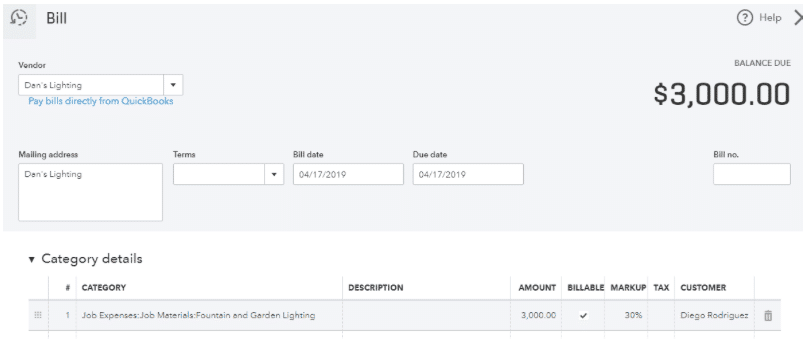
Whether you enter your expense into QuickBooks as a bill, check, or expense, you can mark it as billable. This means you will both enter the name of the customer that the expense will be paid for by, as well as check off the billable box. If you want to markup the cost you can enter the applicable percentage. When you save your transaction the expense gets recorded as usual, and a non-posting transaction is also recorded called a billable expense.

Billable Expenses: Overview photo of Bill Section in QuickBooks


Create Billable Expenses

Above is a sample expense screen for some lights purchased from Dan’s Lighting that was for a project related to customer Diego Rodriquez. If you don’t see the billable, customer, and markup fields on your screen you may have to activate them first or upgrade to a higher level of QuickBooks Online.

Step 1 – Set Up

Make sure you are using QBO Plus or a higher version. To activate these options click the Gear icon in the upper right of QBO, then Account and Settings. Under the Expenses tab make sure the following two features are turned on: “track expenses and items by customer” and “make expenses and items billable.” Also, tick the box for “markup with a default rate of X%.” You can leave the default percent as 0.

Step 2 – Categorize the Expense

Then within the expense or bill screen, tick the box for billable and enter the customer name that pertains to the charge. You can also indicate a percent mark up if applicable. The description entered on the expense will flow through to the invoice, but can be edited later.

Step 3 – Send the Invoice

Next, within the invoicing module of QuickBooks as you go to create an invoice for Diego Rodriguez you will be reminded about your unbilled, billable expenses. Depending on the version of QuickBooks that you are using the reminder might be in the form of a pop-up or the expenses might just show off to the right side in a “drawer,” but either way QuickBooks is keeping track of the expenses you marked billable, but have yet to bill out to clients.

All you have to do is add the billable expense to your invoice. Whatever description you wrote on the expense will show on the invoice. If you have a markup, that will show as a separate line item, but not when sent to the customer or printed.

The other nice feature of billable expenses is that these items can post to a different income account called Billable Expense Income on the P&L which makes your reporting more informative.

Create Reoccurring Expenses

In the case of the IT Professional or anyone who sells the same thing at the same price to their client, there is even a faster way to do this.

Set up an item or product/service for the expense. Then every time you purchase the same item you can just type the name of the item and all associated information will pre-populate. If the purchase reoccurs on the same day each month you can even save it as a reoccurring or memorized transaction so it automatically posts. The memorized transaction will hold all the necessary information including expense account, amount, description, mark-up percentage, transaction amount, and the client responsible for the charge.

Part II: Going In-Depth

If you want to explore more in-depth how billable bills and expenses show on the Profit and Loss Statement of your financial reports, please continue on:

Reporting Billable Expense

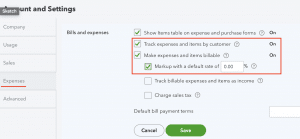
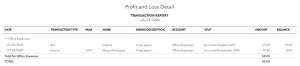
The option underneath the red box in the above screenshot says “Track billable expense and items as income.” If this box is not ticked, creating a billable expense will create a positive entry to the selected expense account as well as a corresponding negative expense in the same account, in essence wiping the expense from your books. Your P&L Detail report would look like this. If this was the only transaction on your P&L your net income would be $0. 

Reporting Billable Expenses: Profit/loss details

As you can see this places an invoice/income transaction type into an expense account. We feel this method portrays inaccurate financial statements. To fix this problem, we recommend you tick the box in Account and Settings > Expenses to tell QuickBooks to “track the expenses and items as income” instead. 

Track Billable Bills and Expenses As Income

Once this box is ticked your Income Statement will show both an income amount and an expense amount. This also works if using a Cost of Goods Sold type account. With this additional setting enabled your P&L will now look like this.

Billable expenses profil and loss statement

Multiple Income Accounts

When turning on the feature to “track billable expense and items as income” there is one additional option for even more detailed reporting. 

account and settings: multiple income

This is to track expenses in more than one account. As seen on the above Income Statement sample the income account holding the billable expense is called Billable Expense Income. While our example only contains one expense, if there were more, regardless of what type of expense they were, they would all post to that same account: Billable Expense Income. 

If you want a bit more detail in your reporting ticking the box “in multiple accounts” will give you that option. Let’s say you want to have billable expense income for office supplies in the account called Billable Expense Income, but want to have billable expense income for repairs and maintenance in an account called Repairs Reimbursement. 

To do this, go to your Chart of Accounts and find the repairs and maintenance account. Click the black arrow at the right of the row and select Edit. The account creation box appears, now with an additional option.

Create account in Chart of Accounts and find the repairs and maintenance

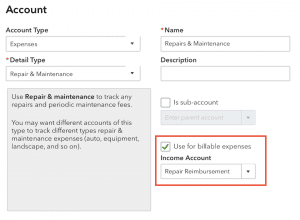
For our example you can see we selected the income account where we want such expenses to post when marked billable. In the new P&L screenshot below you can see the new repair expense is in a separate income account from the billable expense income related to office supplies.

new repair expense as a separate income account from the billable expense income related to office supplies.

If you need help customizing billable expenses to work for your business please reach out to our Cleveland-based accounting and bookkeeping team. We have experience customizing this and other QuickBooks features to many different industries. .

Cleveland’s Best QuickBooks ProAdvisor

The team at Szweda Consulting provides a wide variety of services from Quickbooks Training, system design, payroll, and more. If you are looking for a bookkeeper to help you have more time to spend on your business, give our team a call at  (216) 509-1561.


Ready for some help?

Free Consultations Available!
Our most popular services:
  • QuickBooks Cleanup
  • Bookkeeping
  • Monthly Financial Statements
  • Payroll