The Chart of Accounts (COA) serves as the backbone of your business’s financial tracking system and an essential part of accounting as such. Thus, when you think of QuickBooks, it’s likely that the Chart of Accounts and its proper setup is one of the first things that springs to mind. But, understanding and setting it up correctly can be a daunting task, especially for business owners new to the world of accounting.
This comprehensive guide is designed to walk you through the nuances of the Chart of Accounts in QuickBooks. Whether you’re setting up your Chart of Accounts for the first time, refining it to better suit your needs, or importing an existing Chart of Accounts, we’ve got you covered.
We’ll deep-dive into the world of accounts, dissecting each of its components, and explore strategies to organize your Chart of Accounts in QuickBooks for improved financial performance and management for both SaaS and e-commerce businesses.
And remember, having a well-organized COA isn’t just a matter of accounting and compliance; it’s a crucial part of making informed business decisions and ensuring your company’s financial health.

What is the Accounts Chart in QuickBooks?
The Chart of Accounts (i.e., COA) lists all the accounts created in your accounting software. Think of it as your general ledger’s index or table of contents.
From cash and other asset accounts to income and expense accounts, every account you can choose from when categorizing transactions is listed in the Chart of Accounts. Any account you want listed on your Profit and Loss Statement (i.e., P & L) or Balance Sheet must first be created within the Chart of Accounts.
What are the Main Types of Accounts in the Chart in QuickBooks?
The Chart of Accounts is divided into various sections and subsections. The main areas are asset, liability, equity, revenue, and expense. Within these sections are more detailed subdivisions.
For example, under assets, you’d find everything from cash accounts and accounts receivable, to inventory and fixed assets.
Editing Accounts in the Chart
Method 1
The Chart of Accounts can be edited in two ways within QuickBooks Online. If you need to add a new account, you can do so on the fly as you categorize transactions by following these steps:
- Type the new account name in the category box on the bill, check, or expense transaction you’re creating. When the software doesn’t find an existing name match, it’ll list “+ Add new” as an option at the top of the dropdown menu. Clicking this will give you a pop-up window to create your new account.
- Be sure to review the “Account Type” options and select the correct one. If you need clarification, reach out to your accountant for help. When performing QuickBooks Online Clean-up projects or even reviewing existing clients’ books, we often find clients have created new accounts under the Account Type “Bank.”
Account Types are listed alphabetically, and “Bank” therefore appears first. However, the most common account type clients want to add is an expense account, so select this dropdown box and pick the correct option. This setup set is essential as the Account Type dictates on which report the account will be placed. Bank-type accounts go to the Balance Sheet, whereas Expense-type accounts go to the P & L.
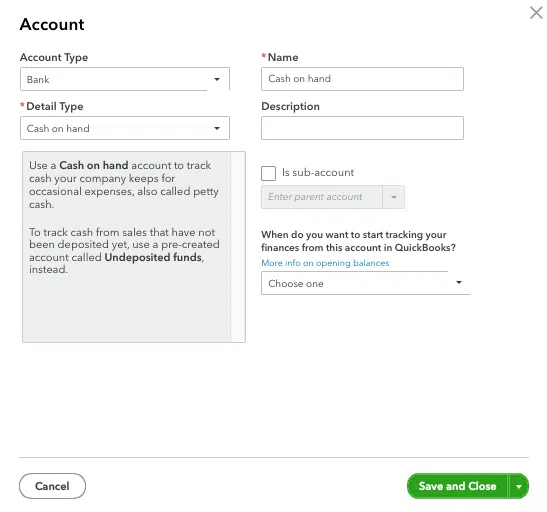
- Review the Detail Type options. This step can also guide you on what type of account should be created. Selecting different Detail Type options will give you a short description of the Account Type’s purpose. While this option is less critical, we recommend picking the correct type. Not doing so can cause problems later if you need to merge accounts or work with sub-accounts.
- Finally, give your new account a name. Note that this name will appear on your financial statements, so pick something you want to display publicly.
If you want to create sub-accounts, you can do so before saving the screen. Tick the box for “Is sub-account.” Then select the parent account from the dropdown menu. The parent account must already be in existence.
For example, if you want a travel parent account with a hotel and airfare listed below it, create the travel account and then make the hotel account. When creating the hotel account, tick the “Is sub-account” box and select “Travel” from the menu. This functionality will give you indented accounts on your P&L and the option to collapse the more detailed accounts.
Method 2
The second method to edit the Chart of Accounts in QuickBooks Online is for more substantial adjustments. While you can add new accounts this way, this method is primarily for importing an Excel-based Chart Of Accounts or for changes to existing accounts, such as merging duplicate accounts, creating sub-accounts, or inactivating unused accounts. To make these types of changes, navigate to “Bookkeeping” > “Chart of Accounts” if in the QuickBooks Online Business View. If in the Accountant View, navigate to “Accounting” > “Chart of Accounts.”
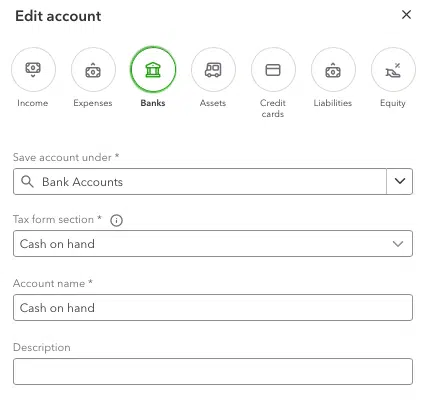
Once there, you’ll find a column on the far right called “Action.” There will be a blue downward arrow in this column on each row. Click that arrow to edit or make the Chart of Accounts items inactive. The edit button will also allow you to start building sub-accounts.
Intuit has rolled out a new view for the Chart of Accounts in this part of QuickBooks Online. When accessed this way, “Account Type” is now depicted by round image icons at the top of the pane, and “Detail Type” is now called “Tax form section.”
Additionally, creating sub-accounts works differently. There is a new dropdown menu called “Save account under.” This option lets you select the existing account under which you want the new account you are creating or editing to appear. You’ll get a real-time preview of your reporting at the bottom of the screen so you can see what your changes will look like before saving them.
Does QuickBooks have a Sample Chart of Accounts?
When you buy a new QuickBooks subscription, the software comes with a default Chart of Accounts. However, a one-size-fits-all Chart of Accounts doesn’t exist.
The QuickBooks Chart of Accounts relies heavily on sub-accounts, which can leave only a few transactions in an account at year-end. Being a default Chart of Accounts, it’ll also include many more accounts than you need. Finally, it contains some accounts of a personal nature, which encourages tracking non-business transactions in QuickBooks.
It’s recommended to go through and inactivate accounts you don’t want to use. This way, you’ll only have to make these decisions once, instead of coding e-transactions each time, and if you have multiple people working in QuickBooks, it’ll keep them all on the same page.
How Do You Import Accounts in QuickBooks Online Chart?
Often franchises are a preferred Chart of Accounts by their home office. Sometimes business coaches or leadership groups provide businesses with a template Chart of Accounts.
Companies transitioning from another accounting software may also have an exported Chart of Accounts from the software they want to use. In any of these cases, if you have an Excel-based Chart of Accounts, you can easily upload the file into QuickBooks Online, so you don’t have to create new accounts one at a time.
To do so in QuickBooks Online, navigate to “Bookkeeping” > “Chart of Accounts” if you use the QuickBooks Online Business View. If in the Accountant View, navigate to “Accounting” > “Chart of Accounts.” You’ll see a green “New” button in the top right of the screen with an arrow next to it. Click on the arrow, and select “Import.”
You should click the blue link to “Download a sample file.” This file gives you the format your data must be in for your import to succeed. Remember, punctuation and spacing matter. Ignoring this principle can easily create duplicate entries in your Chart of Accounts.

How to Organize Your Accounts Chart for Improved Financial Performance & Management for SaaS and E-commerce Businesses
While QuickBooks comes with a sample Chart of Accounts, we recommend that all businesses take a few moments to customize it before starting to categorize transactions. If you jump right in without planning, your P&L will not be as helpful.
It’s essential to take some time to think about what data you want to track. What data will you need to review to make informed business decisions? What do you want your reports to look like? What trends will you be interested in monitoring month-to-month? Your Chart of Accounts directly affects your P&L, so spending time on this before entering data will make your month-end close process go more smoothly.
Here are some tips for better organizing your chart of accounts in QuickBooks Online:
- The first area you need to pay attention to surrounds customization and deciding what level of detail you wish to have access to later on. A business with corporate travel may lump all travel expenses into one account called “Travel”. Others may choose a travel account with sub-accounts for airfare, rental cars, hotel stays, or tolls and parking. A similar structure can be used for utilities. Both options are correct from a tax accounting perspective, so it’s up to you how much information you want access to.
The same is valid for income. You could lump all your revenue into one account. QuickBooks Online provides a default account called “Sales” for this very purpose. However, consider being more specific and include accounts that shed more light on operations and related information. You might have a bucket for each type of service like our firm does (e.g., tax prep revenue, bookkeeping revenue), or you could separate income by market (e.g., B2B vs. B2C or Residential vs. Commercial).
- We recommend that every business, not only manufacturing companies, have a Cost of Goods Sold (COGS) section on their P&L. For this to occur, it must be set up in the Chart of Accounts. Think about which costs directly produce your revenue, and instead of selecting the Account Type “Expenses,” select “Cost of Goods Sold” when creating these accounts. Such accounts would include the wages of non-managerial staff and any physical materials or software used to produce your income directly.
- Finally, it’s Chart of Accounts best practice never to list vendor or customer names in your Chart of Accounts. While information at this level is important, other places exist to access that data. In the Chart of Accounts, account names should be broad categories to encompass many similar transactions. Accounts shouldn’t be created for just one transaction, but also shouldn’t be a catch-all type account where the dollar amount for the year rises above all others exponentially. Accounts should also not be repetitive. If you find yourself entering the same account name over and over, for example under different parent accounts, it’s a good indication that using QuickBooks Online Class feature could help you.
The Bottom Line
The Chart of Accounts serves as the financial roadmap for your business. It not only reflects your current fiscal status but also influences the way you make strategic decisions for your company’s future. By understanding how to properly set up, edit, and customize your Chart of Accounts in QuickBooks Online, you’re ensuring that your business’s financial information is accurate, comprehensive, and tailored to your unique needs.
Remember, your Chart of Accounts should grow and adapt with your business. Regularly reviewing and improving it will keep it relevant, reflecting your evolving business needs. Whether you’re running a SaaS startup or a burgeoning ecommerce empire, a well-crafted Chart of Accounts provides critical insights and information necessary for making data-driven business decisions.